Adding Images to Your Website
Please note that your website is given 100MB (metabytes) of space on the web server. More can be added at a later date. Even so, it is necessary to be cognizant of how images and PDF files can gobble up your space quickly. If you want images throughout your website, you must learn to process them correctly or have the Web Development team do it for you.
On this page, you will learn where to place your images in WordPress and how to upload them. You will also learn that there are several ways to place images on your web pages.
- Using the “Add Media” button
- Using the “Add Media” button with additional styling code
- Using the “Featured Image” tool
Properly Processing of Images
To process your images, you will need a photo manipulation software package, such as Adobe Photoshop. If you do not wish to process your own images, place your image in a shared folder in One Drive, shoot us an email, and we will process it for you. If you have Adobe Photoshop and would like basic photo manipulation training, please contact us at ls-web@uwm.edu.
See Preparing Images for the Web.
Where does WordPress store images?
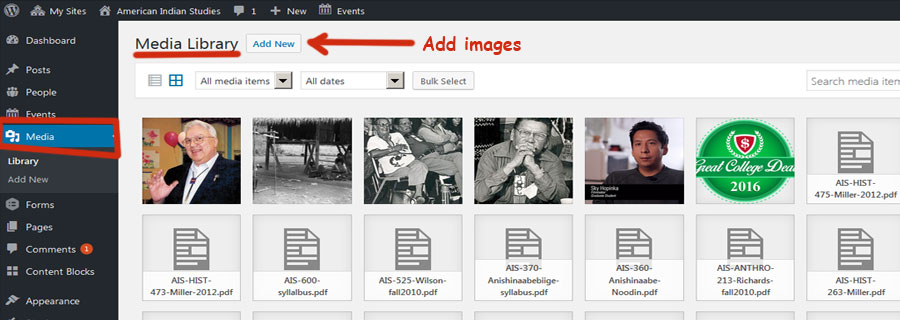
WordPress stores your images in the Media Library. In Dashboard view, on the far left side vertical column, choose “Media.” Besides images, PDF and Doc files are also stored in the Media Library.
Uploading your images to the Media Library
You may wish to upload your images in the Media Library prior to placing them on your webpages. Click the ADD IMAGES button (see image, above), locate your image on your computer and select it. A new window opens that displays your image. To the right, you may re-name the image and give it an alt-tag (alt-text). It will automatically save.
Let’s put an image on your page
In Edit Page mode…
- Place your cursor on your webpage where you want the image to appear.
- Select the ADD MEDIA button at the near-top left side of your editor panel.
- You will notice an INSERT MEDIA window-panel has appeared where all your pictures, PDFs, and DOC files are kept. (See image, above.)
- Choose your image by clicking on it once. The image will be highlighted and you will see a small blue box with a white checkmark.
- Make sure the image is imported at the correct size and alignment. Do this by scrolling to the bottom of the window-panel and looking for Attachment Display Settings on the right side. If you want the image at full size, make sure the correct numbers are being displayed. If you want the image to be centered on the page, open the menu choices next to “Alignment” and scroll down to “center.”
- Click once on the INSERT INTO PAGE button at the bottom right side of your panel.
- The image now appears on your page.
Place an image using L&S style guide code
For placing images more precisely, refer to the LSITO WordPress Styling Guide at L&S Web Style Guide > Images. Correct code is provided for controlling image size, the desired location (alignment) on a page, captions, borders, and if you want text to flow around your image.
See American Indian Studies’ “About Us” webpage where two images have been placed using the L&S Web Style Guide. One image is narrow and wide with a fine line border, and the other is displayed flush right with text run-around.
If you are not comfortable placing code into your WordPress html text editor, or it you have placed an image that won’t display correctly, contact us anytime for assistance. Request Form for Existing Websites.
Place an image using the “Featured Image” tool
WordPress offers a built in “Featured Image” tool that is available on every page of your website (never use on homepage). It is easy to use and most commonly seen on News and Events pages.
- To see how Featured Image displays an image on a page, see the Meet Leigh Mahlik post on the Art History website.
- To use the Featured Image tool, see the News and Events section (2-d) at Adding a News Post.
A Note about Retina Displays
Retina Displays, first introduced by Apple, pose a challenge for web developers. The Retina Display is so pixel dense that the resolution of your images must be higher than those for regular displays. This means that your low resolution images (72 ppi) could become blurry and pixelated on the Retina Display. Because of this, we advise using larger images to avoid too much degradation. As of this writing, large Retina Displays are still in the minority, which gives us a little slack. The challenge is to balance image quality (and quantity) with the necessity of keeping within your website’s allotted server space.