This page’s sidebar navigation is currently unavailable on smartphone devices.
Editor Role: Post Tutorial
This page serves as a basic tutorial for WordPress users who have been assigned an Editor role. If you find content that is unclear or in error, please contact Cheryl Totty L&S Web Developer at totty@uwm.edu.
Access Your Site
Access the administration dashboard of your site by adding wp-admin to the end of the site’s URL.
Example: https://uwm.edu/global-studies/wp-admin
Once signed in, notice the menu list on the left side of the admin area. These are the items needed to affect the site—most notably Posts and Pages appear as a list in the sidebar. (See Figure: Admin. The dashboard for your site may be a different color.)
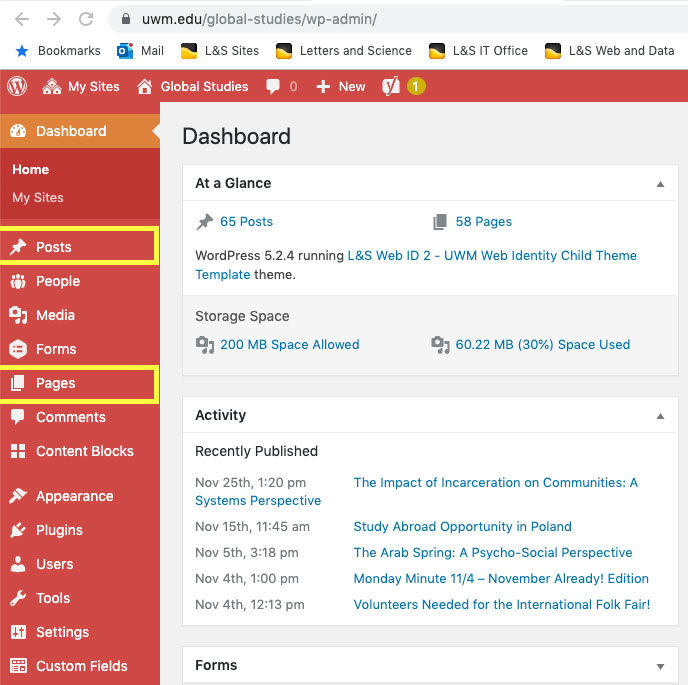
Figure: Admin
Also while a user is signed in, the live site can be browsed and the admin bar at the top of the page can provide access for editing and creating items. (See Figure: Top Bar. Click it to see larger image.) Accessing posts and pages from this bar returns the user to the admin area of the site.
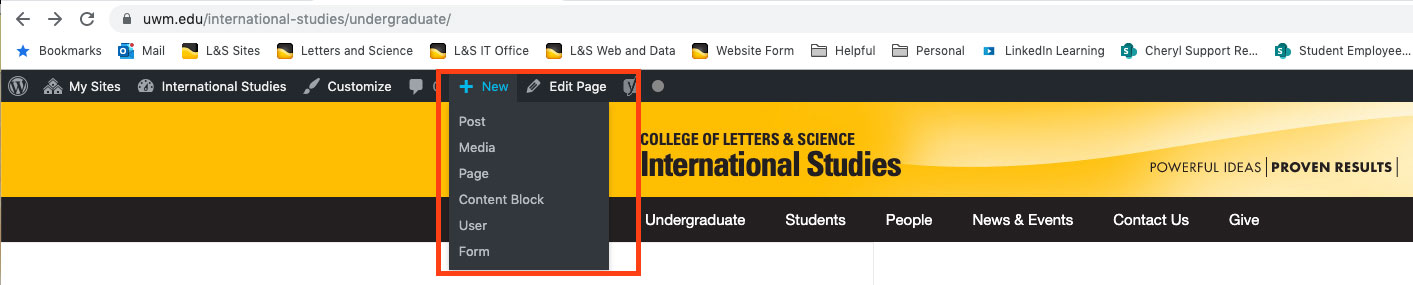
Figure: Top Bar
It is helpful to have two browser windows open when making changes to a specific post—one window showing the admin editing area and one showing the live post. Using the Preview Change option will automatically open another window tab. More on that later. This two-window setup prevents switching back and forth within one window while editing.
Understand Roles
Each role assignment has different limitations within the site. Below is a list showing the very parameters of creating and editing. Read more information about roles [leaves site] in the WordPress documentation.
Summary:
- Administrator: Access to everything*
- Editor: Access to all posts, pages, comments, categories, images, tags, and links
- Author: Access to write, edit, publish, and upload photos to their own posts
- Contributor: Access to write and edit their own post, but no publishing nor uploading permissions
*UWM has limited the role of the administrator for some of the top-level functions.
Posts vs Pages
This tutorial is only related to creating and editing posts and their elements, even though some of the same information also applies to pages. Publishing live posts may be done from start to finish by an editor, so that is the scope of instructions below. An Editor may easily edit and update an existing page; however, creating and publishing a page requires manually choosing a display template, adding it to menus, and more.
Please contact our office for one-on-one training to learn how to create and publish pages. Of course, you are always welcome to have us create, edit, and publish posts and pages for your site. You can find our site support request form here.
To understand the difference between posts and pages and how WordPress uses them in a site, the list below explains some of the high-level differences.
Posts
- Dynamic content items that are linked and pulled into proper positions automatically by assigning categories and tags
- Sometimes short-lived, such as event posts that should expire or news items that might expire
- Rarely directly linked to from the main navigation menu at the top of the site.
- May be linked to from the sidebar navigation on the News & Events pages, but this happens automatically based on category and tag assignment, not through a manual linking process
- May be sorted and ordered dynamically based on specific attributes
Pages:
- Static content items often directly linked to from the main navigation menu at the top of the site, as well as from the sidebar navigation
- Do not expire automatically; moving or deleting a page is a manual process
- Must be linked and unlinked manually
- Contain topical information that is usually long-lived, even if the specifics of the information changes. For example, a Courses Offered page may change course offerings every year, but the page itself remains on the site
Create a News/Event Post
Whether from the admin sidebar or from the live-site menu bar, after selecting Add New, a generic post window will appear. The following is one workflow option. You may choose a different order in which to work, but all of the steps in the process should be completed before publishing.
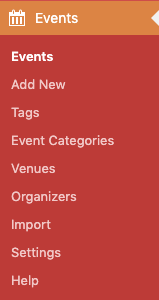
Figure: Events Menu
Important:
If you are creating Events using the Events plugin menu item in the left sidebar (see Figure “Events“), you can ignore the steps below. The steps below are instructions for using Posts to create and edit News posts and Event Posts.
The Events plugin is very straightforward. Published items will show in the calendar on the site if the site has been configured to use the Events plugin.
Post Content Area:
The Post Content Area is where text content and image/document files are added or modified. This area is the main, left-most region of the post-editing area.
- Add the title at the top.
- Below the title, in the upper right of the content field, choose the Visual tab. (See Figure: Visual.)
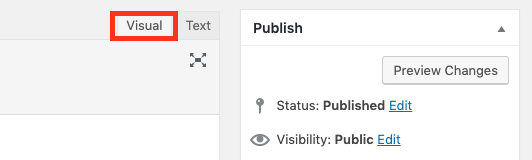
Figure: Visual
- Either write directly into the content field, or paste text from another source. Depending on the source, the text formatting and links might not be retained. It is good practice to review any pasted content to check for formatting and linking issues. Links and text may be relinked and reformatted using the rich text features and other options at the top. (See Figure: Rich Text.) Hovering over each of the rich text icons reveals a tool tip showing its function.
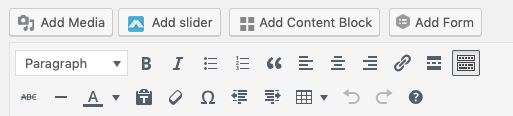
Figure: Rich Text
- (optional) To improve the Search Engine Optimization (SEO) for your post, add up to four Focus key phrases in the field provided. Some valuable information about key phrases can be found in this article from Yoast. [leaves site] Hint: If you’re unsure which words to use, imagine how you might search for the content. In a search engine, enter one or two main key words that are important to the content. As you type, the search engine will offer popular suggestions based on those words. Pick the combination of words that most closely matches the content. If none match closely enough, trust your instincts.
- (optional) If key phrases have been added, it’s a good idea to edit the Snippet Preview. Up to 140 characters may be used to summarize the post and integrate your exact key words. The snippet is the text that will show up in search results. If no snippet is added, the first 140 characters of your content will show in search results.
- (This step for Events posts only. News posts skip to #7.) In the Categories area on the right, select Events. This will create date, time, and location fields that should be completed before publishing.
- Add content to the Excerpt field. This can be a summation of the post, it can be the same as the snippet, or it can be any text you want to use to describe the event or news. Whatever is entered in the excerpt field will appear in the news/events list on the home page. Read below about formatting the excerpt text.
Excerpt HTML Tags
If bold or italic text or line breaks are needed in your excerpt text, use the following HTML tags. The changes will not take place while editing the excerpt field, but the formatting will appear on the published post.
- Bold text: Wrap the text to be bolded in <strong></strong> tags. Example: <strong>This text will be bold.</strong>
- Italics text: Wrap the text to be italicized in <em></em> tags. Example: <em>This text will be italicized.</em>
- Line break: Add a <br /> between text that should appear on different lines. Example: This is a line of text.<br />This is a line of text that will appear on the next line in the published post.
Post Settings Area:
The Post Settings Area contains items that affect the status, placement, order, and functioning of the post. This region is the right sidebar of the post-editing area.
- (This step for News & Monday Minute posts only. Events posts skip to #2.)
Select News as the category for news posts. Monday Minute posts use the Monday Minute category. This will already be selected for Events for an event post if the instructions in the Post Content Area step #6 were followed . - (optional) Add any Tags to identify the main subjects of your posts. Separate tags with commas.
- If the post is to expire—Event posts should always expire—under Post Expirator, set the expiration date and time. As this is an optional plugin, if the site does not have this option, let us know.
- Under How to Expire, select one of these options:
- Draft: hides the post from the live site, but doesn’t delete it
- Category: Replace: keeps the post on the live site, but puts it in a new category
- For Events, the replacement category is Past Events. For News, the replacement category is Past News. (If your post expirator does not have these categories, let us know.)
- Prior to publishing, select Preview Changes. This will open a new browser tab on top of your editing window. The Visual Editor will probably look different to the Preview. You may encounter spacing and formatting you’d like to modify before sending it to the live site.
Note: If you select Preview Changes, and then return to the editor to make additional modifications, you must select Preview Changes again to see the results of those edits. Refreshing a Preview window will not reflect any changes made AFTER the preview was generated. However, if the preview window is left open while making other edits, when Preview Changes is selected again, the updates will appear in your original preview window. This prevents you having multiple preview windows open for the same post. - To create a draft instead of publishing, select Save Draft. You may continue to save your work as a draft with that same button until ready to publish.
Note: After selecting Save as Draft or Publish, the “undo” command will no longer work in the content editing area to restore previous actions. To save the ability to undo steps, continue using Preview Changes to review your work. - Once everything looks okay, close the preview window and….
- Select Publish.
- (optional) Once a post has been published to the live site, the post can “stick” to the top of the News and Events lists and remain there regardless of publication date. Next to Visibility, select Edit and then select the checkbox to “Stick this post to the front page.” When you want the post to fall back into the normal date order, you can de-select this checkbox. (See Figure: Sticky.)
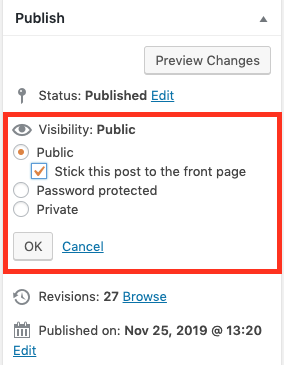
Figure: Sticky
In the unlikely event a post becomes messed up beyond an easy fix, use the Revisions tool to restore an old page. (See Figure: Revisions.) When the dialog box appears, move the slider at the top to scrub through a comparison of versions. Select the version that contains the information needed, and select Restore.

Figure: Revisions
Edit a News/Event Post
Once a post has been published, it may be accessed for further editing by either of the means mentioned earlier: the admin area or the top WordPress bar on the live site.
For list of all posts, access them from the admin area. If it does not show in the first page, it can be found by browsing through pages or searching for it at the top of the list window.
Hovering over each post causes editing options to appear. (See Figure: Edit Options. Click it to see larger image.)
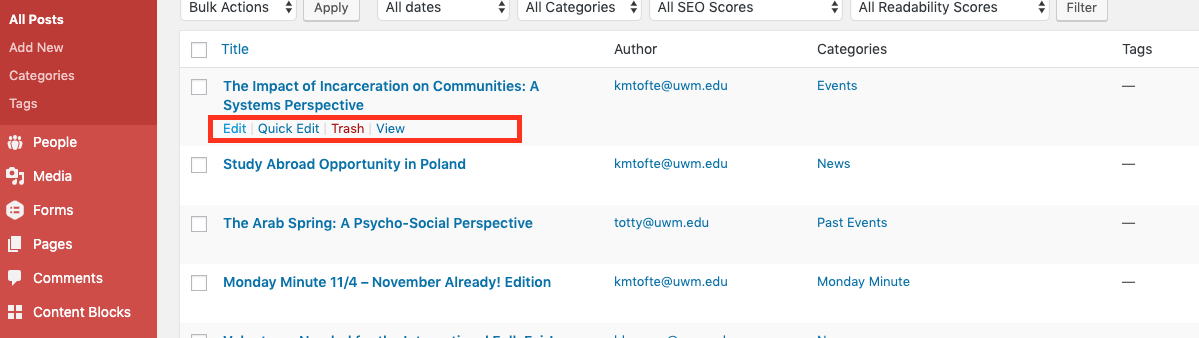
Figure: Edit Options
- To edit the actual content of the post, select Edit.
- To select attributes about the post (for example, its category or its publication status), select Quick Edit.
- To delete the post, select Trash. The post will be moved into a trash area where it will stay for 30 days. After that time, no recovery options are available. Consider changing the status to Draft in Quick Edit if you may need the information on a post/page for a later date.
- To view a post on the live site, select View .
Once a post is open for editing, changes can be made to any previously created content and most of the settings. On a previously published post, the Publish button changes to become an Update button. Select Update to push changes to the live site.
Images and Other Files
Before any images or files are added to the site, they should be sized and optimized for fast download and less storage use, as well as prepared for accessibility best practices. Below are instructions for how to size and optimize images in PhotoShop; how to reduce file size for PDFs, and how to tag images for accessibility
These steps may look complicated at first, but they are very simple. They are being written in detail, so they appear extensive.
Image Sizes:
- Front page “hero” images: 1920px W x 450–500px H
- All other site images: 800px wide or less
Optimize in Photoshop:
- Start the Photoshop application.
- Under File, select Open, and navigate to the image.
- When the image has opened, under File, select Export, then Save for Web (legacy).
- In the dialog box that appears, use either the Optimized or 2-Up tab selected at the top. Optimized will show you the result of your choices. 2-Up allows for comparison of the modifications to the original image. In the 2-Up option, always select the second image (a blue border appears around the selected image) and not the original.
- On the top right side, select JPEG High as the preset. No other fields should be modified in this area.
- Move down to Image Size and make sure the link between W and H is not broken. This maintains the proper aspect ratio. Once the width has been input, the height will adjust automatically and proportionally.
- In the W field, input a size 800px or less, and press the tab button on your keyboard to view the change. Continue to adjust as needed, pressing tab on your keyboard to see changes without saving them, until the size to be used is determined. (Note: make sure 100% is selected in the lower left of the dialog box so that it shows an accurate representation of how the image will appear on your screen.)
- Once the image is sized as desired, select Save… at the bottom.
(If the original image was a JPEG file, the image will be overwritten if the file name remains the same. The file name may also be changed to create a new file that is now optimized.
If the original image was not a JPEG, this process will create a new file automatically, because the new, optimized file has a .jpg extension.) - Save the file somewhere easily accessible for WordPress upload.
- Close the original image window. When the dialog box comes up, select “Don’t Save.”
Reduce PDF Size in Acrobat:
Sometimes, file sizes of PDFs are much larger than needed. If a PDF is larger than 500k, reduce the file size as much as possible by using the following steps. (If the PDF has been specifically created or remediated for maximum accessibility, skip this file reduction procedure.)
- Start the Adobe Acrobat application. (Note: This is the full Acrobat application, not Acrobat Reader.)
- Go to File > Open, and navigate to the file.
- When the file is open, a Tools tab shows at the top of the document window. (See Figure: Tools Tab.) Select this tab.
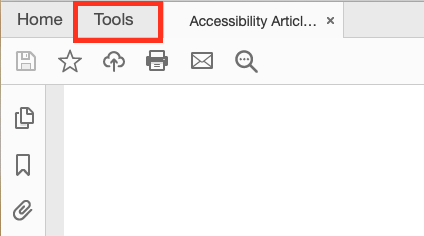
Figure: Tools Tab
- Under the section Protect & Standardize section, find the Optimize PDF icon. Underneath it, select Add. (If the choice is Open, that indicates this feature has already been enabled.)
- Click away from the Tools tab and back onto the document tab.
- A list of Tools appear to the far right on the document window. (See Figure: Tool Icons.)
Figure: Tool Icon
If only tool icons are showing, click the arrow on the thin, gray bar just to the left of the icons to expand the tools section. If no tools are showing at all, in the application menu bar, navigate to View > Show/Hide > Tools Pane. The Tool bar should now appear on the right of the document window.
- Select Optimize PDF.
- At the top of the document window, select Reduce File Size. (See Figure: Reduce.)

Figure: Reduce
- Dialog boxes asking for file name and save location will appear. Enter these with the preferred information, and save where they can be easily accessed for WordPress upload.
- While optimizing and after optimization is complete, a message in the lower right of the document will show the status. Some files are drastically smaller; some only save a bit of space, but every bit helps.
- Close document window.
NOTE: If Reduce File Size does not produce the desired results…
- Select the Advanced Optimization option in the document menu.
- Keep the default Standard settings, and click “OK.” This sometimes results in a more complete reduction in file size.
- Save your optimized document same as Step #9 above.
- Close document window.
Import Files Into WordPress:
Add files (images, documents, and multimedia) directly into a post, or add them to the Media Library. Maximum file size is 5MB per file.
Upload Files to Media Library
This method is best for importing multiple optimized images that will be used in more than one post or page throughout the site. It can also serve as a holding area for images that will used at a later date, but which can now be found easily by any editor.
- Select Media from the site dashboard sidebar.
- Select the Add New button at the top of the page.
- Drag and drop optimized files into the browser window where indicated, or click the Select Files button to browse for the files to upload. Note that multiple files may be uploaded at one time using both methods.
- The file will now appear in the library, which can be filtered and searched, and also displayed as a thumbnail grid or a list with columnar information about the images/files.
- When a file is selected, a sidebar will appear on the right showing details about that image. Most of the details are editable.
Add Files Directly in Posts
This method is best when importing one or more new or existing library file(s) directly into one post.
Add Existing Files
- While adding content into the post, place the cursor where the file should appear.
- Select the Add Media button above the rich text area. (See Figure: Media.)
Figure: Media
- This opens the Media Library dialog box. If the image/file has already been uploaded, it can be selected from the available items.
Note: Image details can be edited, but be aware that this changes the details for other places on the site this image might also appear. - Select Import into Post at the bottom of the dialog box.
- The Media Library dialog box closes, and the content editor now shows the image placed into the spot where the cursor was.
- If the file is an image, it can be clicked on to bring up more placement and editing options.
- If the file is a document, its import will appear as a link. See Best Practices > Document Links below for more information.
Add New Files
- If a file is not already in the Media Library, place the cursor in the text where the file should appear.
- Select the Add Media button above the rich text area. The Media Library dialog box will open.
- Select the Upload Files tab at the top. (See Figure: Upload.)
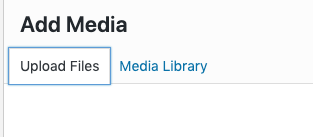
Figure : Upload
- Drag and drop optimized files into the browser window where indicated, or click the Select Files button to browse for the images to upload. Note that multiple files may be uploaded at one time using both methods.
- Once a file has been uploaded to the library, select a file to bring up setting options on the right-hand side.
- Change or leave settings as needed.
- Select Import into Post at the bottom of the dialog box.
- The Media Library dialog box closes, and the content editor now shows the image placed into the spot where the cursor was.
- If the file is an image, it can be clicked on to bring up more placement and editing options.
- If the file is a document, its import will appear as a link. See Best Practices > Document Links below for more information.
File Details in Media Library
Always add Alt Text to images for accessibility purposes:
- If the image is illustrative and expands upon the text content, describe briefly how it is being used. (No need to state that it is a photo of… or image of… The screen reader knows it’s an image, so this is unnecessary.)
- If the image is navigational, explain that it is a link and the content it is navigating to. Example alt text: “Link to more Global Studies Requirements”
- If the image is decorative and serves no illustrative or navigation purpose, leave the field blank.
—
- Add captions and descriptions if desired.
- If an image/file needs to be replaced with a different image/file, select the item to be replaced and choose Replace Media. Follow the steps provided, always remembering to select Update when finished.
- Finally, choose how the image fits into the post/page under Attachment Display Settings.
- Choose Alignment to position the image relative to the text the file is being placed in. (This option can also be changed in the post AFTER placement if changes are needed.)
- Skip down to Size. Choose the option that works best for the content.
- Come back to the Link To option. None is okay if an image is used at full size. If Thumbnail or Medium are chosen, Link to Media File will open the image at the full size for better viewing. That way, if a thumbnail or medium image that is hard to see is clicked, the full-size original can be viewed for clarity.
- An image may also be a link to a custom URL—another page, post, or site within UWM or even an external site. If an image link is a URL, be sure to designate it as a link in the Alt Text area.
- Link to Attachment Page is rarely needed, It ties the image to the post.
- These options are all available again once an image has been placed in the post/page.
- PDFs and Word docs use the same steps for upload as images. Since they only appear as links, they do not have display options. See Document Links for best practices on adding documents to posts.
- Prior to deleting a file from the Media Library, be sure it is not being used somewhere on the site; otherwise, it will create a broken image/file link.
Best Practices
The items listed below are best practices for accessibility, and they are also part of best practices for a positive user experience. Fortunately, these are simple measures that can be taken to result in good universal design.
Images
Determine Alt Text needs as determined in the above topic Importing into WordPress.
View file size and optimization information for images.
URL Links
Make links something descriptive. Let the user know both the general content of the link as well as its location end, if needed.
Examples:
Poor URL Link Usage:
For more information, visit this link: http://news.cornell.edu/stories/2011/04/poor-plant-defenses-promote-invasive-beetles-success
(The URL is long, the “call to action” is weak, and the reader doesn’t know it will leave the UWM site unless they are paying attention to the URL.)
Poor URL Link Usage:
For more information, click here.
(The long URL isn’t showing, but the link also does not let us know what the content behind the link is, the call to action is weak, and the user doesn’t know that it will leave a UWM site.)
Best URL Link Usage: For more information, read this article from Cornell about fighting invasive beetles. [leaves site]
(The long URL is hidden, but the text allows the reader to know what to expect, it is a strong call to action because it contains key words about the content, and it lets the reader know it will leave the site. This allows them to determine if they want to stay on the site, leave the site, or open the linked site in a new window.)
Sometimes, rarely, you might want a link to open in a new window. If so, indicate that at the end of the link with [opens in new window].
Document Links
The same general rules apply to document links as to URL links. Let the user know both the general content of the link as well as its location end, if needed.
When a PDF or Word document is added to the post, by default, the link will appear as the title of the document. This is often not the best text to use, unless the document name has followed best practice.
- In your post, place the cursor where the document link will appear.
- Select the Add Media button at the top of the content area.
- Browse to the file you want to use, select the file, and click Insert Into Post. If the document needs to be uploaded, follow the instructions for PDF file size reduction first. Then follow instructions to Add New Files.
- By default, the link will come in as the document name. To change the link name:
- Use the cursor to select the entire link.
- Click the pencil icon to edit.
- Click the gear icon to reveal options.
- Leave the top URL field as is.
- In the Link Text field, change the text to something more descriptive. If the file is a PDF, add [PDF] at the end. If it is a Word doc, add [DOC] at the end.
- Click Update.
Examples:
Poor File Link Usage: To learn more: GlobalStudies_12/01/2019_winterEdition
(The info is sort of there, but it’s not an easy read, and it doesn’t indicate what file type it is.)
Best File Link Usage: Read the 2019 Winter Edition of our Global Studies newsletter. [PDF]
(This info is clear about the content and about the file format.)
Headers
Always use headers to break up your text into meaningful sections. This is effective for visual scanning of information for everyone—users and editors, as well as for screen reader scanning. Use bold, underline, italics, and color for emphasis sparingly, but never use them as headers or subheads. If everything is formatted to be important, nothing will appear important.
Header tags can be found in the rich text options above the content area under the default paragraph dropdown menu. Select the text to be tagged as a header, select the dropdown menu in the rich text options, and choose the header that makes sense for the content structure.
- Heading 1 is reserved for the page title by default, so do not select it.
- Heading 2s are the content’s top-level headings. Perhaps only one H2 will be used on a post, but a few H2 headings may appear on a page that covers many topics on one page.
- Heading 3s are to be used similar to sub-titles.
- Headings 4, 5, and 6 may be used, but posts do not generally have this much variation in topic structure.
Bullets
Use bullets to break up lists of information that are more easily scanned and understood as lists. Use the actual Unordered and Order list formatting in the rich text options. Asterisks or circle disks or hyphens before lists should not be used because they do not allow a screen reader to read them properly.
Questions?
Please feel free to reach out to me personally at totty@uwm.edu regarding anything in these instructions. If you need general assistance, please use our Website Support Request Form.