Preparing Images for Your Website
Let us imagine that you were given the following photo that needs obvious “tweaks.” Imagine the image is a JPG file at 900 pixels wide. It was named “john900.jpg.” The best advice in working with images is to always work in a duplicate copy of the original image.
Place your jpg image in your image folder. Click on the image title until the name is highlighted, and rename the original “john900original.jpg.”
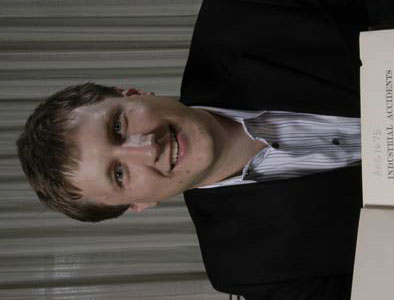 Notice in this example that the photo is incorrectly oriented and is too dark.
Getting Started
- Launch Photoshop application. At the top menu, choose FILE (top left). Then choose OPEN. Locate “john900original.jpg” image and open it in Photoshop. You will see the image in the Photoshop work space.
- Now, you will save a copy. Under FILE, choose SAVE AS.
- In the SAVE AS TYPE field, choose “Photoshop (*.PSD;*.PDD).”
- In FILE NAME field, highlight the word “original” and remove the word. Your file name will be “john900.psd”
- CLICK SAVE.
- You now have a new PSD file to adjust.

Rotate, Brighten, and Resize the Image
- Under the top menu select IMAGE, choose IMAGE ROTATION. Determine the direction of the image spin to make it appear upright. Save.
The image is now upright, but appears dark and gray-ish in color. You will need to brighten it up a bit, and see what you can do to improve the color. Below is just one of several ways to do this.
- Under top menu select IMAGE, choose ADJUSTMENTS, and BRIGHTNESS/CONTRAST.
- Grab the brightness slider, moving it to the right until the image looks brighter and cleaner. Try sliding it to 55. (If you lose your blacks and prefer strong contrast, choose the contrast slider and pull it to the right, just a bit.)

Now, the image is lighter, but the color is still a bit too grey in the facial area. I’d like to see more color added to his face…
- Choose IMAGE, then ADJUSTMENTS.
- Then choose HUE/SATURATION.
- You will see 3 sliders.
- Choose the middle slider and pull it very slowly and gently to the right. Let’s try +15 in this example. Save.

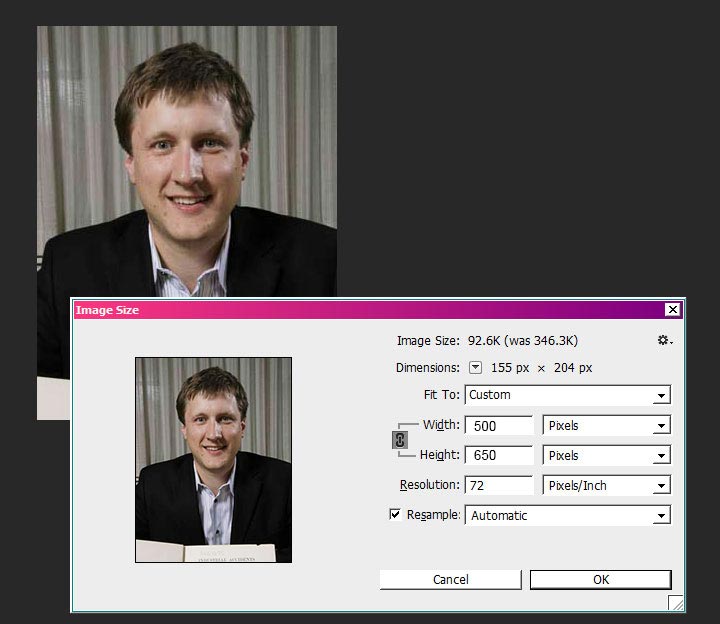
Compare this version of the image to the one above. The fleshy tones are warmer and his hair has brighter highlights.
What next?
Even though we reduced the image here for demonstration purposes, remember that the image came to us at 900 pixels wide. On the webpage, it will display at only 250 pixels wide. This means we need to resize it.
Before High Density Retina Displays, saving the image to 250 pixels wide was adequate and preferable for the web. Since then, displays have become more pixel dense. The Retina Display is 4X denser than a regular monitor. Taking this into consideration, along with the fact that most people don’t have large Retina Desktop Displays and that server space is not unlimited, we strike a compromise. Thus, the image could be reduced in size to 450-500 pixels wide.
Reducing the size of an image
To reduce the size in Photoshop, in the top menu…
- Choose IMAGE, then IMAGE SIZE.
- In the IMAGE SIZE selector box in the width field, type 450 or 500. Make sure measurement increments are set at pixels, and the width and height fields are linked (chain-link icon).
- Resolution will be 72.
- Choose OK.
Sharpening your image
If necessary, sharpen the image…
- In the top menu, select FILTER.
- Scroll down to SHARPEN, then UNSHARP MASK.
- Fill in Amount field to approx. 22%. An under-sharpened image is better than an over-sharpened image. Over-sharpening creates halos and lines around images, so be cautious.
Save your image for web use
- To make a JPG for web use, choose FILE, and SAVE FOR WEB. A window opens…or, if you have the latest version of Photoshop, chose FILE, then EXPORT, then SAVE FOR WEB (legacy).
- On the top right, choose JPEG (same as JPG). For such a small image, save it at HIGH (Quality 60-70).
- Save to your website images folder. (keep this folder organized for future use)
The image is now ready to be placed on your webpage.
More Photo manipulation tips will be added shortly.