Facilities Use Policy for Art Department Studios and Classrooms
In order to provide a safe and secure working environment for students, faculty, and staff, the following facility use policy will govern all Art Department studio and classroom facilities and the use of equipment and supplies.
- In compliance with university policy, only qualified students, staff, and faculty may use Art Department studio and classroom facilities and their corresponding equipment and supplies. Students must be officially registered as a university student in good standing; staff and faculty must be officially employed by the university.
- In compliance with university policy, no facilities or university equipment may be used directly for the generation of private profit or any other benefit outside of the educational mission of the university without prior official approval.
- Facility use policy regarding access, schedule, and specific operation guidelines for classroom studios will be set by the area faculty of that supervising area. Area faculty and qualified facility supervisors should be informed about which students are qualified to use a studio facility and its equipment.
- Facility use policies for specific areas and classes will be included in course syllabi or as a supplemental handout distributed to all enrolled and other qualified users. These policies will be posted in all studio classroom Facilities.
- If students are required to use potentially dangerous equipment, materials, or tools, they will be properly instructed in their operation. Successful completion of department coursework by the student constitutes proper instruction in the use of such equipment. The department faculty should make sure the student user understands and agrees to the facility and equipment in accordance with the supervising area guidelines and safe use policies, university policies regarding drug and alcohol policies, and is responsible for damage or loss of equipment during their time of use.
- Access to and use of facilities and equipment must be supervised during regularly scheduled class periods by a faculty member or other qualified supervisor. All designated supervisors should be familiar with the facility use policy of that studio, properly trained and familiar with all emergency and notification procedures regarding that facility, equipment, and supplies. Emergency and notification procedures must be posted in all equipment and tool intensive areas. Unsupervised and open access to any facilities will be allowed only on a case-by-case basis with prior written approval from a supervising faculty. This prior written approval must document the user, facility, dates of use, and reason, and must be accompanied by a completed release form. A copy of the written approval should be kept by the user and the supervising faculty member.
- The official end date of a term, and during official term breaks and holidays must comply to the facility use policy procedures. In most cases, undergraduate degree students should have access to facilities only after the start of classes and only until the official exam time for their classes. Special and graduate students must have prior written approval.
- Supervisors will be trained by faculty. Supervisors will observe, enforce, and report violations and suspected violations of the department or university facility use policies immediately to the supervising faculty, head and department chair.
(Approved by the Art Department, Feb. 12, 1998)
Hand Tool Safety

Hand tools are a fundamental aspect of many businesses and institutions. However, hand tools are involved in many injuries to workers.
For instance, according to Accident Facts, hand tools are involved in 6% of all compensated work injuries. This figures increases to 14% for non-compensated work injuries. The average cost of a hand tool injury is listed as $1250. This is only counting the direct costs and not the indirect injury costs (i.e. lost production).
Causes of hand tool injuries can often be traced to some type of improper use or maintenance of the hand tool. The below information focuses on non-powered hand tool safety.
Some ways to avoid hand tool injuries include:
- Use the right tool for the job. Some examples of misuse of tools are using a wrench as a hammer, pliers as a wrench, knife as a saw, claw hammer as a ballpeen hammer, screwdriver as a chisel, etc.
- Ensure you have the correct size tool, such as correct screwdriver, pliers, wrench, scissor, etc.
- Individuals using the tool should be trained in the basic safety and proper use of the tool.
- Keep tools in good condition. Broken or worn tools (i.e. wrenches with cracked or worn jaw, electric tools with broken plugs, etc.) should be repaired or discarded immediately. Report defective equipment to your supervisor.
- Use tools the way they were intended (i.e. drive a wood chisel outward and away from your body).
- When using a knife, cut away from the body and keep hands and body clear of knife stroke.
- Razor blades and utility knife blades should be disposed of in a puncture-resistant sharps container.
- Be cautious of tools around electrical equipment. Only trained and qualified individuals may work on electrical equipment.
- Store tools in a safe place. Many accidents have been caused by tools falling from overhead, and by sharp tools carried in pockets or left in toolboxes with the cutting edges exposed. Ensure the tool is put away in the proper place after use and that sharp edges or blades are protected or enclosed to prevent contact.
- Ensure tool handles are wedged tightly in the head of all tools.
- Hand tools such as chisels and punches, which develop mushroomed heads during use, must be reconditioned or replaced as necessary.
- Keep tool cutting edges sharp so the tool will move smoothly without binding or skipping. Dull tools can be more hazardous than sharp tools.
- When using hand tools, maintain a good grip and stand in a balanced position to avoid sudden slips.
- Wear gloves when necessary to protect your hands. However, be cautious of gloves and/or loose materials when using powered tools where they could get caught in a moving part.
- Wear other personal protective equipment as warranted such as eye, face, and hearing protection, respirators, appropriate shoes, etc.
- Keep wood handles free of splinters and cracks.
- Wrenches should not be used if jaws are sprung or loose.
- When using hand tools, ensure area around your work is clean, dry, well lit and free of obstructions when possible.
- When using a screwdriver, do not hold an object in one hand and press a screwdriver into it, place it on a bench or a table.
- Be cautious of spark-producing hand tools when working near flammable materials. Use non-sparking tools when necessary.
- Consider ergonomically designed tools to fit the tool to the worker — especially those tools that are utilized frequently and repetitively during the day.
- Inspect your tools before each job to ensure proper condition.
(Hand tools safety tips courtesy of Jeff Karcher, Director of Environmental Health and Safety, UW-Stevens Point)
Art Studio and Shop Safety Rules for Powered Equipment
Safety Rules for Powered Equipment:

In order to maintain the highest level of safety and efficiency in the work area, it is necessary to conform to standard work practice behavior. When working with equipment of any kind you must be aware of the potential for injury and observe behaviors that will eliminate risk. Organization and planning are fundamental aspects of safety.
Work Behavior:
Please observe the following in the work area. You are using a shared space, so sensible and considerate behavior will enhance the community experience.
-
- Do not rush. Be organized and plan in advance what equipment you will use
-
- Plan the type of work activities you will be engaged in
-
- Respect others’ space and working time. Distractions cause accidents
-
- Keep your working area tidy and organized.
-
- Ask questions about equipment and technique. If you are unsure, request individual help
-
- Do not run or move quickly in the space
-
- Be aware of who is using what, and the location of others in the room
-
- Concentrate when using hand tools and larger equipment
-
- Wear sensible clothing
-
- Use the right tool for the right job
-
- Do not eat, drink or smoke in the work area
-
- Wash your hands when you have finished
-
- Do not work in inappropriate areas
All pieces of powered equipment are potentially very dangerous if mishandled. You must comply with all safety regulations when using the equipment. The following are general safety guidelines for use of some of the powered equipment typically found in studios and shops.
Machine Guarding: Mixer Information
Food and material-handling mixers are used in a variety of applications at UWM, including food service, art studios and research laboratories. Users must be aware there are certain inherent hazards with this type of equipment. Supervisors and instructors must ensure all mixing equipment is code-compliant, in safe working order and that users are properly trained in the safe use of the equipment. Applicable OSHA/DCOM regulations include:
Please direct any questions regarding safe use of mixing equipment to your supervisor or instructor. |
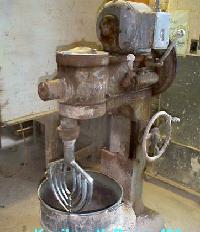
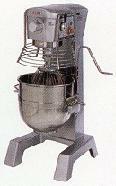 Image: Example of a modern mixer with proper machine guarding and interlock devices. See image of an antique mixer lacking proper guards and safety devices. Image: Example of a modern mixer with proper machine guarding and interlock devices. See image of an antique mixer lacking proper guards and safety devices. |
| Source: The following information was produced by the Industrial Health and Safety Program, Occupational Health and Safety Branch, Ontario Ministry of LabourAlert I23/0100 ISSN 1195-5228 DOUGH MIXERS
Hazard Summary: Two workers were killed in 1999 in dough mixing machines because the machines were not properly guarded or locked-out. Many other workers continue to suffer severe injuries from such machines. Access to the moving parts such as whisks, paddles, hooks or other blending accessories has caused these fatalities or crushing, laceration or fracture injuries. Hazard Location: Recommended Precautions and Legal Requirements:
Remember that while complying with the occupational health and safety laws, you are also required to comply with applicable environmental laws. |
Specific Tool Safety:
Band Saw
-
- Do not operate under the influence of drugs, alcohol or medication
-
- Always wear eye protection
-
- Remove ties, scarves, rings, necklaces and other jewelry and roll up sleeves
-
- Tie back long hair
-
- Safety guards should be in place at all times
-
- Make sure the saw blade teeth point downward to the floor
-
- Adjust the upper blade guide about 1/8 of an inch above the material being cut
-
- Make sure the blade tension and blade tracking are properly adjusted
-
- Stop the machine before removing off-cuts
-
- Always keep your hands and fingers away from the table
-
- Hold work piece firmly against the table. Do not attempt to saw stock that does not have a flat surface, unless a suitable support is used
-
- Hold firmly and feed into blade at moderate speed
-
- Turn machine off if the material is to be backed out of an uncompleted or jammed cut
-
- Make release cuts before cutting a long curve
-
- Shut off power and clean the band saw and work area before leaving the machine
Bench Grinder
Bench grinders and grinding equipment are found in many UWM shops, studios and laboratories. These devices have several basic adjustments and machine guarding components that must be utilized so the machines can be used safely. Typical accidents involving grinders have included fingers caught in machine components and eye/face injury due to wheel disintegration, missing guards or misadjusted components.
Supervisors and instructors must ensure all grinding equipment is code-compliant, in safe working order and that users are properly trained in the safe use of the equipment. Please direct any questions regarding safety procedures to your supervisor or instructor.
Bench Grinder Safety Rules:
-
- Do not operate under the influence of drugs, alcohol or medication
-
- Always wear eye protection (safety glasses or a face shield).
-
- Remove tie, rings, watch and other jewelry and roll up sleeves.
-
- Make sure the wheel guards are in place. Grinding creates heat; don’t touch any portion of the workpiece until you are sure it has cooled.
-
- Adjust the spark guards to be close to the wheel, and re-adjust these spark guards as the wheels wear down to a smaller diameter
-
- Be sure blotters and wheel flanges are used to mount the grinding wheels onto the shaft of the grinder.
-
- Stand to one side of the wheel when turning on power
-
- Tool rests should be adjusted close to the wheels and thoroughly tightened in place so they cannot shift position while in use
-
- Inspect the wheels before turning on the power. DO NOT use wheels that have been chipped or cracked.
-
- When grinding, use the face of the wheel only.
-
- Dress the wheel on the face only. Dressing the side of the wheel would cause it to become too thin for safe use.
-
- DO NOT use a wheel that vibrates. Dress wheel, replace the wheel, or replace the bearings of the shaft if these are worn. Grinding creates heat; don’t touch ground portion of workpiece until you are sure workpiece has cooled.
-
- Shut off the power and do not leave guards as the wheels wear down to a until the wheel has come to a complete stop and the work area is clean when finished using machine.
Bench grinder components and adjustments (Source-OSHA):
 |
 |
Can you identify any missing parts on these bench grinders?
 |
 |
Drill Press
-
- Do not operate under the influence of drugs, alcohol or medication
-
- Always wear eye protection
-
- Remove ties, scarves, rings, necklaces and other jewelry and roll up sleeves
-
- Tie back long hair
-
- Safety guards should be in place at all times
-
- Clamp work to table if it is too short to contact the column. Hold the material securely with a vise or clamps
-
- Clamp work when using hole saw or cutting tools larger than 1/2″ diameter. DO NOT exceed recommended speed for the drill, accessory and workpiece material
-
- Remove chuck key from the chuck before activating the drill press
-
- Make all adjustments with the power off
-
- Adjust the table to depth stop to avoid drilling into the table
-
- Be sure the drill bit or cutting tool is securely locked into the chuck
-
- Shut off power, remove and put drill bit or cutting tool away and clean the table before leaving the machine
Sander
-
- Do not operate under the influence of drugs, alcohol or medication
-
- Always wear eye protection
-
- Remove ties, scarves, rings, necklaces and other jewelry and roll up sleeves
-
- Tie back long hair
-
- Maintain minimum clearance between table and sanding belt or disc
-
- Make sure belt is tracking correctly and properly installed on the belt finishing machine
-
- Make sure belt is not torn or loose
-
- Always keep hands away from abrasive surfaces
-
- Always use a backstop when using the belt finishing machine in a horizontal position
-
- Never use gloves or hold the work with a rag when sanding
-
- Always sand on the downward side of disc when using the disc finishing machine so that the work is held securely on the table
-
- Shut off power and do not leave until the machine has come to a complete stop. Clean the work area when you are finished.
Table Saw Safety
-
- Do not operate under the influence of drugs, alcohol or medication
-
- Always wear eye protection
-
- Remove ties, scarves, rings, necklaces and other jewelry and roll up sleeves
-
- Tie back long hair
-
- Blade guards should be kept in place and used whenever the cutting operation permits
-
- Always use saw blade guard, splitter and anti-kickback fingers for “through sawing”
-
- Keep hands out of the path of saw blade
-
- Stand to one side, NOT in line with the saw cut when ripping
-
- Always use a “push stick” when ripping narrow work
-
- Know how to avoid “kickbacks”
-
- Do not perform any operation freehand. Always hold the work firmly against the miter gauge or fence
-
- Never use the fence when cross-cutting
-
- When using a moulding cutterhead, never run the stock between the fence and the moulding cutterhead
-
- Never reach around the saw blade
-
- Keep the saw blade sharp and free of all rust and pitch
-
- Make all adjustments with the power off
-
- Shut off power and clean the saw before you leave
Radial Arm Saw
-
- Do not operate under the influence of drugs, alcohol or medication
-
- Always wear eye protection
-
- Remove ties, scarves, rings, necklaces and other jewelry and roll up sleeves
-
- Tie back long hair
-
- Blade guards should be kept in place and used at all times
-
- Always use saw blade guard and anti-kickback fingers for “through sawing”
-
- Keep hands out of the path of saw blade
-
- Know how to avoid “kickbacks”
-
- Do not perform any operation freehand. Always hold the work against the fence
-
- Make all adjustments with the power off
-
- Never reach around the saw blade
-
- Keep the saw blade sharp and free of all rust and pitch
-
- Never start the machine with the workpiece against the blade
-
- Never perform a cross arm cut
-
- Return the cutterhead to the full rear position behind the fence after each crosscut operation
-
- Never perform layout, assembly or set up work on the table/work area when the machine is running
-
- Shut off power and clean the saw before you leave
Other Equipment
“Tool Safety Rules” Template  (Blank sign to be used to create your own tool specific posting.)
|
|
Indoor Air and Environmental Quality: Darkroom Ventilation

Question from the Mailbag:
How much ventilation is needed in a photographic darkroom?
Until 1999, Wisconsin had specific language in the Department of Commerce DCOMM 32.27 (formerly IHLR 32.27) on darkrooms.
- 32.27(9) DARKROOM VENTILATION. Exhaust ventilation shall be provided for all darkroom facilities. The capacity of the exhaust ventilation shall equal at least 12 air changes per hour, or an engineered local exhaust system shall be provided. History: cr. Register, March, 199l, No. 423, eff. 4-l-9l; am. (2) (b), cr. 2) (d), (e) and (9), Register, August, 1995, No. 476, eff. 9-l-95.
The 1998 revision to the Department of Commerce regulations removed the earlier language specific to darkroom ventilation, leaving only general Industrial Ventilation requirements for hazardous contaminants, under DCOMM 64.54(3).
- DCOMM 64.54(3)Industrial Exhaust System
- Contaminants.
Industrial exhaust systems shall be installed and operated to remove harmful contaminants… - Make-up air. Make-up air shall be provided as required by s. Comm 64.14. The quantity of make-up air shall equal at least 90% of air exhausted.
- Connections. connections between industrial exhaust systems that convey different materials, the combination of which may produce explosive, heat-generating, corrosive, toxic or otherwise dangerous mixtures, shall be prohibited.
- Contaminants.
In the UWM Mitchell Hall Darkroom Ventilation Upgrade (1998), an engineered local exhaust system was provided. With that in place, a system was installed that allowed for energy conservation after normal business hours. The system included an override capability which could be activated by workers who happened to come in after normal hours. The override was on a timer so the system would revert back to energy conservation after a certain time period.
To answer your question…12 air changes per hour is a good design specification. With 12 air changes per hour, the amount of air entering and leaving a darkroom should totally replace the air in the darkroom every five minutes.
We are open to ideas about energy savings during unoccupied periods.