Training Certificate/Annual Review Form

I.PRINCIPLE
Steam or “moist heat” is the most effective and practical sterilizing agent in general use today. It is inexpensive, nontoxic and very reliable.
The X1 is a fully automatic electric steam heated gravity air removal sterilizer designed for the sterilization of hard goods and liquids in a vented (open) containers. The X1 PLC based Control System continuously monitors and displays the relevant temperature and pressure in the sterilizer. It also automatically initiates and controls each phase of the sterilization cycle according to pre-selected instructions for greater assurance of sterilization.
II.SCOPE
This policy includes general use and operation of the X1 steam sterilizer, and applies to all students and staff at the University of Wisconsin-Milwaukee that utilize the X1 autoclave. If processing biohazardous waste for disposal, SSR-3A-PB autoclave should be used and procedure Biohazardous Waste Disposal [SAFE 2.0] must be followed.
III. EQUIPMENT
Consolidated X1 Electrically Heated Steam Sterilizer
IV. TRAINING
All staff and students that expect to operate this equipment must review this procedure, complete training by Lab Manager or PI, and fill out X1 Training Certification Log.
V. PROCEDURE
The operator must wear protective clothing, including face shield, thermal gloves, high heat vest, and proper lab attire when loading and unloading the chamber. Some materials, especially fluids, may cause severe burns to exposed skin.
Table 1– X1 cycle settings, If changed, parameters should be returned to the following:
| Cycle | Temperature (C) | Sterilization Time | Dry Time |
| Dry (Gravity) | 121 | 30min | 20min |
| Fluid | 121 | *See Table 2 |
A. CYCLE SELECTION
a. DRY sterilization cycle
i. The DRY cycle is intended for use with wrapped goods (instruments etc.), pipette tips, empty bottles, empty tubes, pasture pipettes.
ii. The Dry cycle should never be used for any fluids or liquids. Liquid sterilized with the dry cycle will boil over due to the fast exhaust rate, which can lead to a loss of liquid and damage to the sterilizer
iii. Recommended sterilization time for the DRY cycle is 30min with a 20min dry time.
b. FLUID sterilization cycle
i. The FLUID cycle is intended for use with all fluids and liquids. The FLUID cycle is designed to have a slower exhaust rate, which will allow for cooling of liquids and help minimize loss due to boil over.
ii. Fluid sterilization time is determined based on the fluid volume of the largest container, as larger volumes will take longer to heat and properly sterilized.
- Container volumes should be minimized so that cycle times remain manageable.
iii. Recommended sterilization times can be found in TABLE 2. Table 2 is provided as a guide only. Please refer to the specific material’s procedure or package insert for the manufacturer’s recommendations about the best temperature and time for sterilization
TABLE 2- Recommended Fluid sterilization times (To be used unless stated in material’s procedure or package insert)
| Temperature Setting | Liquid Volume (mL) | Time Setting (Min) |
| 121°C (250°F) | 75 | 25 |
| 121°C (250°F) | 250 | 30 |
| 121°C (250°F) | 500 | 40 |
| 121°C (250°F) | 1000 | 45 |
| 121°C (250°F) | 1500 | 50 |
| 121°C (250°F) | 2000 | 55 |
| 121°C (250°F) | >2000 | 60 |
B. HOW TO RUN A CYCLE
- Fill out Autoclave Use Log [EQUIP 2.0.B] and indicate time and cycle setting of
your run in order to ensure autoclave will be available when you need to use it.
i. Log is located on the cart between the two autoclaves.
b. If nothing is displayed, press on the screen to wake it up.
c. Wearing appropriate personal protective equipment (gloves and lab coat), load items into sterilizer. If sterilizer is already turned on and warm, face shield, heat resistant gloves, and heat resistant apron must also be worn. All items must be contained in autoclave buckets or pans to reduce spillage and damage to the autoclave.
NOTE: IT IS CRITICAL THAT ALL CAPS ARE LOOSE TO AVOID EXPLOSION OR CRUSHING OF ITEMS IN AUTOCLAVE. ALL ITEMS MUST ALSO BE PLACED IN BINS AND PANS WITHOUT OVERFILLING TO AVOID SPILLING OF CONTENTS. FAILURE TO FOLLOW THESE INSTRUCTIONS MAY LEAD TO SERIOUS INJURY AND/OR DAMAGE TO THE AUTOCLAVE.
d. Close the door to the sterilizer and turn the wheel clockwise to tighten. “DOOR– CLOSED” will print with a time stamp
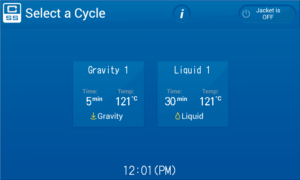
Select your cycle Gravity for dry items like tips and empty glass wear or if you are autoclaving liquids then select the liquid cycle.
Select your cycle Gravity for dry items like tips and empty glass wear or if you are autoclaving liquids then select the liquid cycle.
You can change any parameters necessary by taping the parameter you wish to change. This is especially important with liquid cycles as the time needed to sterilize the liquid depends on the volume to be sterilized. See TABLE 2 for guidance.
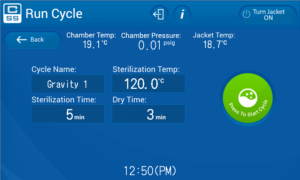
Once you have your cycle set for your items to be sterilized press the green start button

Once the cycle is started you will see this screen
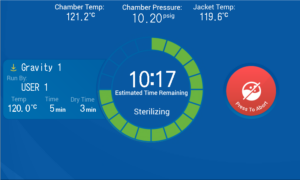
You can see the cycle parameters and the time remaining in the cycle. If the jacket was not on and ready at the start of your cycle the jacket will need to heat up before the cycle starts. This will happen automatically. The jacket will take around 30min to heat up.
Once the cycle is complete you will see this screen
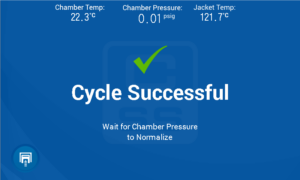
An alarm will sound once the chamber presser is normalized until the door is opened.
C. HOW TO ABORT A CYCLE THAT HAS BEEN STARTED
If there is a problem or you forgot to add something the cycle can be stopped by pressing the

red abort button on the screen.

If you press the abort button you will be asked to confirm
Once you have confirmed you want to abort the cycle you will see the screen below.
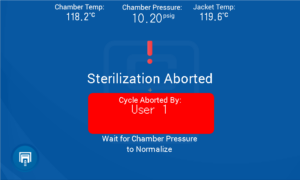
Or if there is an emergency you can press the E-button located just below the control panel.
D. HOW TO REMOVE A LOAD
i. Upon completion of a cycle, the chamber pressure will drop to < The alarm will sound off intermittently until the door is opened.
ii. Wearing appropriate personal protective equipment (PPE)(Heat resistant gloves, apron, face shield, and lab coat), turn the wheel counter clockwise and open the door slowly, being careful not to get hot steam near your face or unprotected skin. Allow autoclave to cool for 10min prior to unloading.
iii. Remove load while wearing the correct PPE and allow items to cool completely
a. Autoclave bins and materials should not be stored in autoclave or left inside overnight, as they can burn if jacket is left on.
iv. When all cycles are complete, verify that the top right screen button reads “Jacket is Off”.
-
- Auto-idle shutoff-Autoclave is set to automatically turn off the jacket if it is idle for more than 1 hour
- EcoCalender-Allows the Jacket to be on during set hours current set hours are 12:00pm to 4:30pm Monday through Friday.
E. CHANGING THE PRINTER PAPER AND RIBBON
Visit the Instructional Videos section of the Consolidated Sterilizer Systems website for step-by-step instructions on how to change the printer paper.
https://consteril.com/resources/instructional-videos/
The manufacturer recommends that the paper and printer ribbon be changed at the same time. Replacement printer rolls can be ordered from Consolidated using the following part numbers:
10-025 – Single Roll
10-026 – Package of 12 Rolls
10-027 – Box of 24 Rolls
10-028 – Printer ribbon
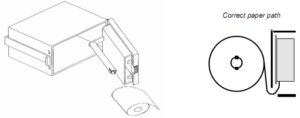
i. Access to the printer paper roll is provided by a hinged front panel. The spring-loaded catch on the left hand side of the printer front panel should be depressed to release the front panel.
ii. The paper roll carrier is mounted on the rear of the front panel and will swing out from the main body for ease of roll changing.
iii. The paper is held in place by a plastic disk. The disk has a raised hub that must be installed against the paper roll. Installation in the opposite direction is a cause of paper jams
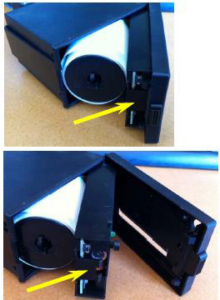
iv. To access the printer ribbon: Once the paper compartment is open, there is a tab on the door that holds the front cover onto the printing mechanism. This tab is marked with a yellow dot and must be pressed firmly in order to remove the cover from the door to access the printer ribbon.
F. DAILY CHECK LIST
a. Check the printer paper. If needed, replace with a new roll (See Section above). If the printer paper runs out during a cycle, the cycle will not be affected, but there will be no paper record to view. Paper supplied by CSS has a color indicator that is a low paper warning.
b. Inspect and clean the door gasket with a damp cloth.
c. Inspect and clean the chamber strainer. A clean chamber strainer is essential to the operation of any sterilizer. A video of how to do so can be found at: https://consteril.com/resources/instructional-videos/
G. ERROR MESSAGES
| Error Message | Explanation | Troubleshooting |
| CHAMBER OVER PRESSURE LIMIT | The chamber has gone over the pressure set point threshold and the cycle has been aborted. | Check the pressure transducer, chamber steam valve, and steam regulator. |
| JACKET OVER TEMPERATURE LIMIT | The jacket temperature has gone above the allowable temperature. | Check the steam regulator and jacket steam valve. |
| CHAMBER OVER TEMPERATURE LIMIT | Chamber temperature has gone 6°F or 4°C higher than setpoint. | Check the steam regulator and Chamber steam valve, exhaust valves, and steam source. |
| CHAMBER UNDER TEMPERATURE LIMIT | The chamber temperature has fallen below the sterilization temperature for longer than the allowed time. | Check the steam regulator and Chamber steam valve. |
| CHAMBER DID NOT REACH STERILIZATION TEMPERATURE | Chamber has taken longer than the allowed time to reach sterilization temperature. | Check steam supply, chamber trap, steam regulator and chamber steam valve. |
| JACKET DID NOT REACH TEMPERATURE | Jacket has not reached setpoint in the allowed time. | Check steam supply, steam regulator, and jacket steam valve. |
| CHAMBER TEMPERATURE SENSOR FAILURE | Chamber drain probe has received a signal less than 38°F/3.3°C. | Check physical connections. Swap with the Jacket probe to see if the problem moves to the jacket. |
| JACKET TEMPERATURE SENSOR FAILURE | Jacket drain probe has received a signal less than 38°F/3.3°C. | Check physical connections. Swap with the chamber probe to see if the problem moves to the chamber. |
| DRAIN OVER TEMPERATURE LIMIT | The temperature of the waste water has been above 140°F/60°C for longer than the allowed time set by the operator. | Check the cold water supply and supply valve. |
| POWER INTERRUPTED | The sterilizer has lost power to the control system while sterilizing and will abort the cycle when power has returned. | Check building utilities.
Check the surge suppressor. Check circuit breakers. |
| WWC TEMPERATURE SENSOR FAILURE | The waste water drain probe has received a signal less than 38°F/3.3°C. | Check physical connections. Swap with the chamber probe to see if the problem moves to the chamber. |
| GASKET PRESSURE LOST DURING CYCLE
(EZ-Glide™ Vertical Door only) |
The gasket has not reached pressure within the allowed time or gasket pressure was lost during a cycle. | Check compressed air supply, Gasket supply valve, vacuum system, and gasket vacuum valve. |
| GASKET DID NOT REACH PRESSURE
(EZ-Glide™ Vertical Door only) |
The gasket did not reach the required pressure setpoint to seal the door. | Check compressed air supply, Gasket supply valve, and gasket vacuum valve. |
| DOOR OPENED DURING CYCLE | The door has been opened or the door switch has failed while a cycle is in progress. | Check the door switch operation. |
| PRESSURE PULSE TIME LIMIT | A pre-vacuum pressure pulse did not reach the set point in the allowed time. | Check the steam supply, steam regulator, and chamber steam valve. |
| VACUUM PULSE TIME LIMIT | A pre-vacuum vacuum pulse did not reach the set point in the allowed time. | Check the vacuum system, vacuum release valve, and water supply. |
VI. TROUBLESHOOTING
A. Autoclave X1 Operator’s Manual may be consulted as needed.
(Contact laboratory manager to request a copy)
B. For all other problems or concerns, contact service.
VII. References
“Autoclaving Guidelines for Sterilization of Lab Equipment.” Lab Manager. Lab Manager, 18 Feb. 2010. Web. 29 May 2015. <http%3A%2F%2Fwww.labmanager.com%2Flab-health-and-safety-tips%2F2010%2F02%2Fautoclaving-guidelines-for-sterilization-of-lab-equipment%23.VWiIqEa4IsI>.
Favero, Martin S. “Disinfection and Sterilization in Healthcare Facilities.” ACS Symposium Series The Combined Approach of Chemistry and Microbiology New Biocides Development (2007): 31-50. Centers for Disease Control and Prevention. CDC, 29 Dec. 2009. Web. 29 May 2015. <www.cdc.gov>.
Operating and Maintenance manual for the Consolidated Model X1, serial #082521 Electrically Heated Sterilizer
“Steam Sterilization Cycles, Part 2: Liquids.” Consolidated Sterilizer Systems. N.p., 24 Apr. 2014. Web. 29 May 2015. <https://www.consteril.com/steam-sterilization-cycles-part-2-liquids/>.
VIII. PROCEDURAL NOTES
A. Training on use and operation of X1 autoclave may be administered by Laboratory Manager, Laboratory Supervisor, or PI. Training certification log must be retained for one year after departure of staff/student. Review of this procedure should occur annually.
B. This procedure and sterilizer are not intended to be used for processing and disposal of infectious or biohazardous waste. If processing waste, procedure Biohazardous Waste Disposal [SAFE 2.0] must be followed and sterilizer X1 must be used.
C. This autoclave is primarily used for autoclaving of course or research materials, and cannot be used for processing and disposal of biohazardous waste.
a. Sterilizer can be used for biohazardous waste disposal only after proper testing and records keeping are initiated, as stated in procedure Biohazardous Waste Disposal [SAFE 2.0].
D. If X1 sterilizer is out of order, SSR-3A-PB sterilizer may be used for course or research materials under the supervision of the lab manager. In order to comply with state regulations in regards to disposal of biohazardous waste, the SSR-3A-BP Sterilizer requires a test cycle every 100 hours of use. All sterilization cycles and times must be recorded on the Consolidated Sterilizer Log (attachment A of SAFE 2.0).
a. In cases when SSR-3A-PB sterilizer is utilized for anything other than disposal of waste, the time used must be recorded and given to the laboratory manager so that proper testing can occur after 100 hours of use.
E. See Consolidated Sterilizer Operators Manual for x1 for all other questions not covered in this procedure.