
Training Certificate/Annual Review Form
I. PRINCIPLE
Steam or “moist heat” is the most effective and practical sterilizing agent in general use today. It is inexpensive, nontoxic and very reliable.
The SSR-3A-MC is a fully automatic electric steam heated gravity air removal sterilizer designed for the sterilization of hard goods and liquids in vented (open) containers. This sterilizer is equipped with a MARK V Microcomputer Control system, which continuously monitors and visually displays the relevant temperature and pressure in the sterilizer.
II. SCOPE
This policy includes general use and operation of the SSR-3A-MC steam sterilizer, and applies to all students and staff at the University of Wisconsin-Milwaukee that utilize the SSR-3A-MC autoclave. If processing biohazardous waste for disposal, SSR-3A-PB autoclave should be used and procedure SAFE 2.0 Biohazardous Waste Disposal must be followed.
III. EQUIPMENT
Consolidated SSR-3A-MC Electrically Heated Steam Sterilizer
IV. TRAINING
All staff and students that expect to operate this equipment must review this procedure, complete training by Lab Manager or PI, and fill out SSR-3A-MC Training Certificate/Annual Review Form, with a submission type of “Initial Training Certification”. After initial training, procedure must be reviewed annually and documented with the Training Certificate/Annual Review Form, submission type “Annual Procedure Review”.
V. PROCEDURE
The operator must wear protective clothing, including face shield, thermal gloves, high heat vest, and proper lab attire when loading and unloading the chamber. Some materials, especially fluids, may cause severe burns to exposed skin.
TABLE 1 – SSR-3A-MC cycle settings. If changed, parameters should be returned to the following:
AUTO JACKET CONTROL should be set to OFF
A. CYCLE SELECTION
a. FAST sterilization cycle
i. The FAST cycle is intended for sterilization of unwrapped goods, glassware, metal, tubing, magnetic stir bars, spatulas, or other porous material.
ii. The FAST cycle should never be used for any fluids or liquid. Liquids sterilized with the FAST cycle will boil over due to the fast exhaust rate, which can lead to loss of liquid and damage to sterilizer.
iii. Recommended sterilization time for FAST cycle is 30 minutes.
b. DRY sterilization cycle
i. The DRY cycle is intended for use with wrapped goods (instruments, etc.), pipette tips, empty bottles, empty tubes, and pasture pipettes.
ii. The DRY cycle should never be used for any fluids or liquid. Liquids sterilized with the DRY cycle will boil over due to the fast exhaust rate, which can lead to loss of liquid and damage to the sterilizer.
iii. Recommended sterilization time for DRY cycle is 30 minutes with 20 minute dry time.
c. FLUID sterilization cycle
i. The FLUID cycle is intended for use with all fluids and liquids. The FLUID cycle is designed to have a slower exhaust rate, which will allow for cooling of the liquids and help minimize loss due to boilover.
ii. Fluid sterilization time is determined based on the fluid volume of the largest container, as larger volumes will take longer to heat and properly sterilize.
1. Container volumes should be minimized so that cycle times remain manageable.
iii. Recommended sterilization times can be found in TABLE 2. Table 2 is provided as a guide only. Please refer to the specific material’s procedure or package insert for manufacturer’s recommendations about the best temperature and time for sterilization.
TABLE 2 – Recommended Fluid Sterilization Times
(To be used unless stated in material’s procedure or package insert)
Temperature Setting Liquid Quantity (mL) Time Setting (Minutes)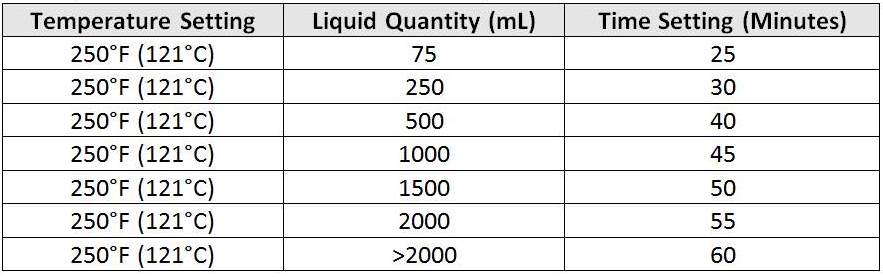
B. HOW TO RUN A CYCLE
See Figure 4 at end of procedure for diagram of screen and keypad
a. Fill out Autoclave SSR3AMC Use Log and indicate time and cycle setting of your run in order to ensure autoclave will be available when you need to use it.
i. Log is located on refrigerator directly across from autoclave.
b. If nothing is displayed, press any key to turn on screen.
c. Wearing appropriate personal protective equipment (gloves and lab coat), load items into sterilizer. If sterilizer is already turned on and warm, face shield, heat resistant gloves, and heat resistant apron must also be worn. All items must be contained in autoclave buckets or pans to reduce spillage and damage to the autoclave.
NOTE: IT IS CRITICAL THAT ALL CAPS ARE LOOSE TO AVOID EXPLOSION OR CRUSHING OF ITEMS IN AUTOCLAVE. ALL ITEMS MUST ALSO BE PLACED IN BINS AND PANS WITHOUT OVERFILLING TO AVOID SPILLING OF CONTENTS.
FAILURE TO FOLLOW THESE INSTRUCTIONS MAY LEAD TO SERIOUS INJURY AND/OR DAMAGE TO THE AUTOCLAVE.
d. Close the door to the sterilizer and turn the wheel clockwise to tighten. “DOOR – CLOSED” will be shown in the upper right corner of the screen.
i. Sterilizer will not start if door is not closed tightly. If open, error message, “INTERLOCK OPEN DOOR OPEN” will be displayed.
e. Turn on the Jacket pressure by pressing the Jacket button. “JACKET PRESSURE IS ON” will be seen in the upper right corner of the screen.
i. If screen reads “JACKET PRESSURE IS OFF”, press Jacket button again.
f. Choose appropriate cycle from the MAIN MENU by pressing the CYCLE SELECTION button, and then choose appropriate number. Review and adjust settings as needed (i.e. Press 3 if the sterilizing time must be adjusted). Once chosen, press 9 (EXIT) to return to MAIN MENU screen. The chosen cycle will display on left side of screen as, “CURRENT CYCLE IS ______”.
i. If MAIN MENU is not displayed, press 9 (EXIT) to return to MAIN MENU in order to select a cycle.
ii. IF CYCLE SETTINGS ARE ADJUSTED, RETURN TO ORIGINAL SETTING ACCORDING TO THE TABLE ABOVE.
g. Press RUN button to begin cycle. Press ENTER button twice to skip the “ENTER OPERATOR NUMBER” and “ENTER LOAD NUMBER” screens.
i. Sterilizer must be on MAIN MENU screen in order to start a cycle.
ii. Cycle will automatically execute once appropriate jacket pressure is reached for cycle.
h. Turn on exhaust fan. Switch is located on the wall opposite of the autoclave.
i. Autoclave will alarm when cycle is complete.
C. HOW TO ABORT A CYCLE THAT HAS BEEN STARTED
a. While the sterilizer is running a cycle, pressing any key on the keypad will cause the cycle to stop. At this time, the operator will be prompted to press CLEAR to abort the cycle, or RUN to continue. Aborted cycles advance to the exhaust phase immediately.
D. HOW TO REMOVE A LOAD
j. Upon completion of a cycle, the chamber pressure will drop to ≤ 2 psi. Alarm will go off intermittently until door is opened.
k. Wearing appropriate personal protective equipment (Heat resistant gloves, apron, face shield and lab coat), turn the wheel counter clockwise and open door slowly, being careful not to get hot steam near face or unprotected skin. Allow autoclave to cool for 10 minutes prior to unloading.
l. Remove the load and allow to cool completely.
i. Autoclave bins and materials should not be stored in autoclave or left inside overnight, as they can burn if jacket pressure is accidentally left on.
m. When all cycles are complete, verify that the top right of the screen reads, “JACKET PRESSURE IS OFF”. This must be done after door has been opened to make sure jacket did not turn back on after opening of door.
i. Jacket pressure will automatically turn off when cycles are complete. The jacket will remain off after FLUID and FAST cycles, but will turn back on after DRY cycle.
ii. The most common finding when jacket is left on accidentally is following a DRY cycle.
E. CHANGING THE PRINTER PAPER
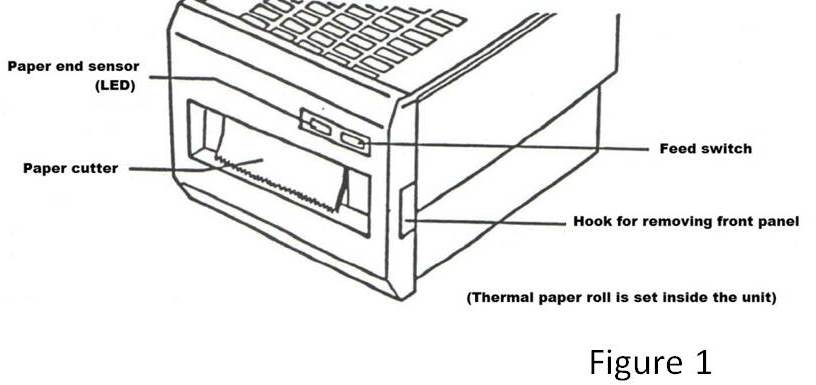
a. The paper roll should be changed as soon as the pink edge marking the end of the paper roll is observed. If the paper runs out during a sterilization cycle, the cycle will be halted due to a printer communications error.
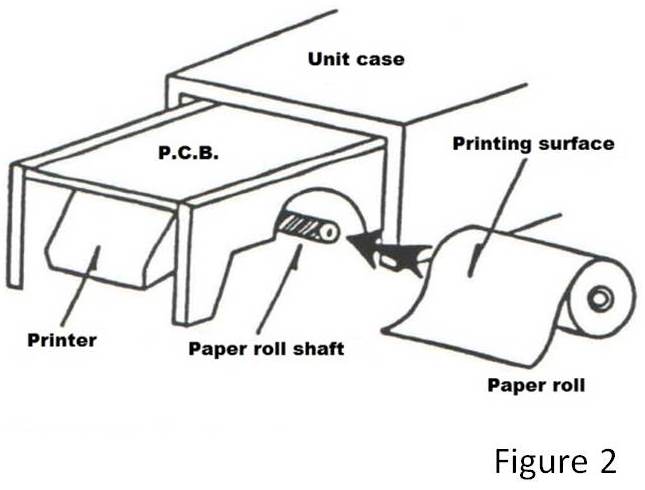
b. The paper roll is set inside the unit. Gently press the two hooks for removing the front panel (See figure 1), remove the panel, and pull out the printer. (See figure 2)
c. Press the ends of the paper roll shaft (See figure 2), and pull out the empty roll. Get a new roll of paper and using a pair of scissors, cut about 12 inches of paper off the new roll. This is necessary to remove the tape markings from the roll, otherwise the print head will be damaged.
i. Use of a pair of scissors for cutting the paper is essential because you will need a sharp cut on the paper. If you try to insert paper with a hand cut edge into the feeder, the print head may be damaged.
ii. The outside and inside surfaces of the paper are different. The “printing surface” is the outside surface.
d. Set the new paper roll on the shaft (See figure 2).
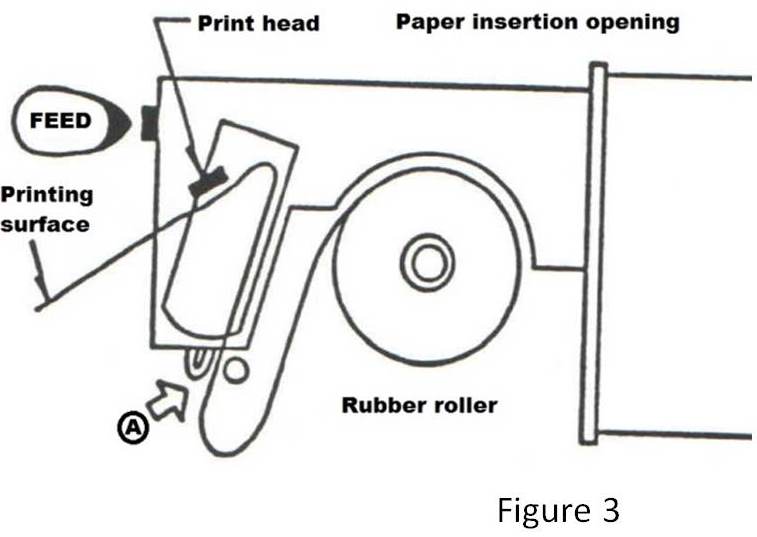
e. Gently push the paper face down into insertion opening A in figure 3. Make sure the edge of the paper does not fold as you do this.
i. DO NOT pull out thermal paper roll from the paper INSERTION opening (Marked with an A in figure 3). This may damage the printer.
f. Repeatedly press the feed switch (See figure 1) until the paper “catches” and comes out from the print head.
i. If the paper is not pulled in by the rollers even when you press the feed switch button, push paper in gently until it catches.
g. Once there is enough paper out of the print head to come out of the paper cutter edge (See figure 1), replace the front panel of the unit.
i. Take extra care not to bend the RED L.E.D. or the FEED button. Bending of these may cause the printer to no longer operate.
F. WEEKLY MAINTENANCE
a. Make sure autoclave is off and totally cool.
b. Remove the stainless steel mesh screen from the front drain hole in the bottom of the sterilizer chamber. Lift out and flush under running water.
c. With mesh screen out, pour 1 liter of hot water down drain with a funnel. Repeat this step a total of three times.
d. Wipe inside and outside of autoclave with damp cloth. Sweep around autoclave to pick up any loose debris.
e. Drain the generator once a week right after the sterilizer has been shut down and the water is still hot. This will aid in drawing off all of the sediment and impurities in the water and keep the cleaning process fairly simple and easy.
G. MONTHLY MAINTENANCE
a. Sterilize all buckets used to store biohazardous materials with disinfectant or bleach solution (≥10% bleach is required for adequate sterilization).
b. Remove inner spinning of hub by taking off handles and center ball. After inner spinning has been removed, you will see the small hole for applying oil with an oil can. On newer models a hole is provided on the inner spinning for applying oil, eliminating the need for removing the spinning. After removal of the spinning, proceed by opening the sterilizer door. This will provide access to the eight screws which hold the stainless steel door cover in place. Remove the two screws on each side of the panel and pull away from sterilizer. Turning the hand wheel towards the left will enable you to grease the center pin and back of the locking arms with a grease gun. Grease all friction points of the door leverage such as balls on locking arms and where pins slide through pin retainers.
c. Oil hinge pins.
H. ERROR MESSAGES (Searchable Database)
| Error Message | Probable Cause | Actions to take next |
|---|---|---|
| 2ND TEMP PROBE FAILURE | Erroneous readings from the temperature probe. | Call service. |
| CHAMBER TEMP NOT SET | Chamber temperature has not been set for the selected cycle. | Input parameter for chamber temperature as stated in section A part f. |
| CHAMBER PRESSURE PROBE | Chamber pressure FAILURE transducer needs to be replaced. | Call service. |
| CRT MEMORY FAILURE | Problem with main board. | Call service. Main board may need to be returned to factory for service. |
| ATMOSPHERIC PRESSURE FAILURE | Atmospheric pressure transducer needs to be replaced. | Call service. |
| CONDITIONING CYCLES ONLY ALLOWED WITH FAST & DRY | Conditioning cycle was chosen while using Fluid cycle. | Only use conditioning cycle with Fast and Dry. |
| CYCEL ABORTED | Termination of current cycle by operator. | Wait until exhaust cycle completes. |
| DOOR OPEN | Sterilizer door is open. | Make sure door is closed and locked tightly. If problem persists, call service. |
| INTERLOCK OPEN | Sterilizer door is open. | Make sure door is closed and locked tightly. If problem persists, call service. |
| JACKET PRESSURE NOT SET | Jacket pressure has not been set for the selected cycle. | Input parameter for jacket pressure as stated in section A part f. |
| JACKET PRESSURE PROBE | Jacket pressure transducer needs to be replaced. | Call service. |
| JACKET PRESSURE TOO LOW | Jacket pressure setting is too low for the selected cycle. | Increase jacket pressure setting as stated in section A part f. |
| MATH OVERFLOW | Problem with main board. | Call service. Main board may need to be returned to factory for service. |
| MEASUREMENT CIRCUITS FAILURE | Problem with main board. | Call service. Main board may need to be returned to factory for service. |
| MEMORY FAILURE | Problem with main board. | Call service. Main board may need to be returned to factory for service. |
| PRINTER COMMUNICATIONS ERROR | Printer not responding. | Check paper in printer and check fuse on main board. |
| PROGRAM FAILURE | Problem with main board. | Call service. Main board may need to be returned to factory for service. |
| POWER FAILURE | There has been a disruption of power during a cycle. | Follow instructions on screen. |
| SECOND WASH MUST BE HOTTER THAN FIRST | Second wash temperature setting is too low. | Re-enter higher temperature for second wash. |
| STERILIZING TIME NOT SET | Sterilizing time has not been set for the selected cycle | Input parameter for sterilizing time as stated in section A part f |
| SYSTEM FAILURE, ALL MACHINE SETTINGS LOST | System memory has been reset. | Re-entry of all parameter settings is required. |
| SYSTEM RECYCLED | Current cycle has been restarted because the temperature fell below the minimum value allowed. | Jacket pressure may need to be increased, or drain hole screen may need cleaning (See section VI.) |
| TEMPERATURE PROBE FALURE | Erroneous readings from the temperature probe. | Call service. |
| VACUUM VALUE NOT SET | Vacuum value has not been set. | Input parameter for vacuum cycle. |
| VALUE NOT SET | Parameters have not been set for the selected cycle. | Input parameters for the selected cycle as stated in section A part f. |
| VALUE IS OUT OF RANGE, TRY AGAIN | Parameter erroneously entered. | Re-input valid parameter. |
VI. TROUBLESHOOTING

A. Autoclave SSR3AMC Operator’s Manual may be consulted as needed.
(Contact laboratory manager to request a copy)
B. For all other problems or concerns, contact service.
VII. REFERENCES
“Autoclaving Guidelines for Sterilization of Lab Equipment.” Lab Manager. Lab Manager, 18 Feb. 2010. Web. 29 May 2015. <http%3A%2F%2Fwww.labmanager.com%2Flab-health-and-safety-tips%2F2010%2F02%2Fautoclaving-guidelines-for-sterilization-of-lab-equipment%23.VWiIqEa4IsI>.
Favero, Martin S. “Disinfection and Sterilization in Healthcare Facilities.” ACS Symposium Series The Combined Approach of Chemistry and Microbiology New Biocides Development (2007): 31-50. Centers for Disease Control and Prevention. CDC, 29 Dec. 2009. Web. 29 May 2015. <www.cdc.gov>.
Operating and Maintenance manual for the Consolidated Model SSR-3A-MC, serial #120698 Electrically Heated Sterilizer
“Steam Sterilization Cycles, Part 2: Liquids.” Consolidated Sterilizer Systems. N.p., 24 Apr. 2014. Web. 29 May 2015. <https://www.consteril.com/steam-sterilization-cycles-part-2-liquids/>.
VIII. PROCEDCURAL NOTES
A. Training on use and operation of SSR-3A-MC autoclave may be administered by Laboratory Manager, Laboratory Supervisor, or PI. Training certification log must be retained for one year after departure of staff/student. Review of this procedure should occur annually.
B. This procedure and sterilizer are not intended to be used for processing and disposal of infectious or biohazardous waste. If processing waste, procedure Biohazardous Waste Disposal [SAFE 2.0] must be followed and sterilizer SSR-3A-PB must be used.
C. This autoclave is primarily used for autoclaving of course or research materials, and cannot be used for processing and disposal of biohazardous waste.
a. Sterilizer can be used for biohazardous waste disposal only after proper testing and records keeping are initiated, as stated in procedure Biohazardous Waste Disposal [SAFE 2.0].
D. If SSR-3A-MC sterilizer is out of order, SSR-3A-PB sterilizer may be used for course or research materials. In order to comply with state regulations in regards to disposal of biohazardous waste, the SSR-3A-BP Sterilizer requires a test cycle every 100 hours of use. All sterilization cycles and times must be recorded on the Consolidated Sterilizer Log (attachment A of SAFE 2.0).
a. In cases when SSR-3A-PB sterilizer is utilized for anything other than disposal of waste, the time used must be recorded and given to the laboratory manager so that proper testing can occur after 100 hours of use.
E. See Consolidated Sterilizer Operators Manual for SSSR-3A-MC for all other questions not covered in this procedure.
IX. ATTACHMENTS
Autoclave SSR-3A-MC Training Certification Log [EQUIP 2.0.A] PDF
Autoclave SSR-3A-MC Use Log [EQUIP 2.0.B]
Autoclave SSR-3A-MC Quick Guide [EQUIP 2.0.C]
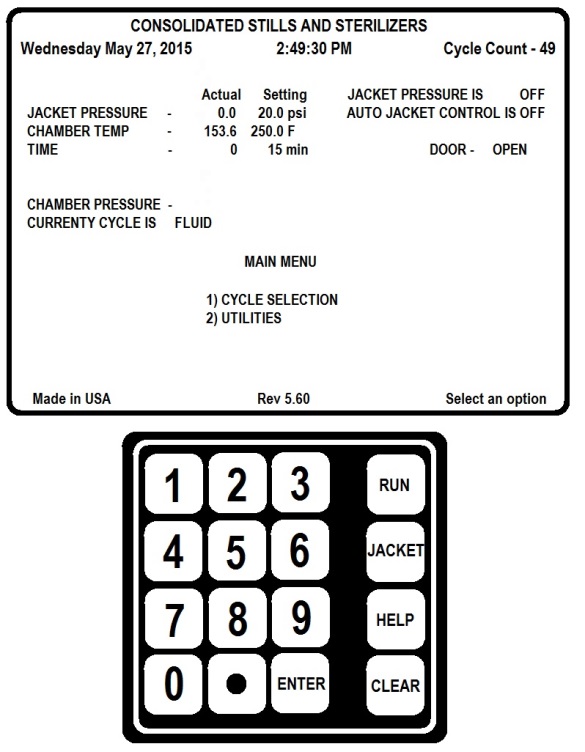
Figure 4 – Diagram of screen and keypad for SSR-3A-MC
Reviewed 8/9/2016, 8/21/2017, 8/10/2018, 8/6/2019